
[Note: This article was originally written in July of 2009, so some details regarding Mac OSX may have changed since then.]
A few months ago, RiverMan Media began developing games for the iPhone and iPod Touch. Not surprisingly, the iPhone development software only runs on the Mac, and so I, a lifelong PC user, had to learn the other side. This article is all about what it took to adjust to the Mac as a game programmer, and what I did to get my user environment as comfortable as possible. I’ll show you exactly how I went from disliking a Mac out of the box to enjoying it thoroughly.
OS Tips, Not OS Ads
I’ve been using Dell PCs my entire life, and I was not excited about having to learn a new OS with all new hardware. Well, “not excited” is a bit of an understatement. I’ve spent that last 15 years or so learning Windows and shaping my work environment into something I really like, and I had no idea how much of that I would be able to reproduce on the Mac.
Now I’m not writing this to sell you a Mac, or convince you to keep your PC (I’ll save that debate for later!). The purpose of this article is to describe what it was like to adapt to a Mac after many years of PC ownership, and explain the tricks I found to make it more comfortable to use. I’ll talk about the mouse, keyboard, keyboard shortcuts, and end with other miscellaneous tips.
Tip Summary
If you’ve read any of my other articles, you know I can go on for pages and pages about small topics. So here’s the summary of all the tips I give, in case you want to jump to particular ones or just don’t feel like reading this mini-book.
Tip #1: Get A PC Mouse if the Mighty Mouse is not for you
Tip #2: Get The Full Keyboard if you like full sized arrows and modifier keys
Tip #3: Swap Control and Command for much more Windows-like keystrokes
Tip #4: Disable Caps Lock if it bothers you on Apple keyboards
Tip #5: Customize Individual Program Keystrokes focus on Control for comfort and Windows-style shortcuts
Tip #6: Advanced Keystroke Customization change keyboard shortcuts for many programs at once
Tip #7: Remap Offhand Modifiers change keys you don’t use to OS functions
Tip #8: Get The Proper Display Adapters especially for connecting to VGA or dual monitoring
Tip #9: Activate Tab Navigation to get around menus with the keyboard
Before I get going, I would highly recommend this book on switching from PC to Mac by David Pogue. My brother passed it on to me and I’ve been reading it cover to cover. It contains a ton of useful advice and MAC references from a guy who clearly understands how PC users think.
The Mighty Mouse
At first glance, you may have no idea how Apple’s mouse functions at all. There are no visible buttons on the top. The two grey pads on the sides that look like buttons aren’t actually press-able. And where the mouse wheel should be, there is just a tiny grey ball poking out of the top-center.
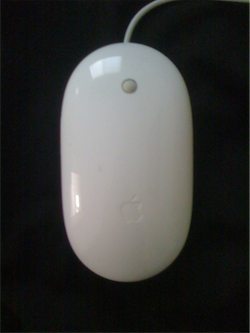
Turns out that it actually does work. The entire top part “clicks” when you press it, the ball works like a 2d mouse wheel, and the side pads are pressure sensitive, acting as if they were buttons when you squeeze them. How about right clicks? If you’re anything like me, you right-click all of the time, from file management to text editing to gaming. By default, the Mighty Mouse has no right click, but you can turn it on in the System Preferences. Although there is no visible division between the left and right sides of the mouse, its pressure sensitivity can tell which side you were trying to click… ideally.
I Miss Tactile Feedback
Although I admit that it has a sleek look, the mouse frustrated me several times. First of all, I couldn’t tell when I was right-clicking. PC mice almost all have a (relatively) large mouse wheel dividing the left and right buttons, which are clearly visible and click independently. With the Mighty Mouse, the only visual or tactile division between the two sides is the tiny mouse ball/wheel. Since the whole top clicks, I found myself sometimes clicking with the middle knuckles of my fingers, rather than the front pads. Also, my fingers tended to wander around the slick top part of the mouse as I used it, since there are no contours to keep my fingers where they are supposed to be.
Because of all these things, the mouse would occasionally misread my clicks, which frustrated me quickly and thoroughly. The side pad/buttons worked fine, but I found pressing them to be unsatisfying, since they don’t actually press. It’s hard to tell how much pressure to apply, and to me, it just felt awkward having to guess. It was like a touch screen minus the screen.
The Wheel/Ball: Great In Theory, But…
The little ball on top acts as a mouse wheel that can scroll in any direction. This is especially useful when faced with a large document or webpage that has a vertical and horizontal scroll bar. I did like gaining this bit of functionality over Windows. However, I had a suspicion that it would wear out fast because it is just so small, and (once again) the feedback did not feel as tight as its Windows equivalent. A PC mouse wheel rotates a certain amount and stops so that you can send a clear “up” or “down” signal, whereas the wheel/ball spins freely.
Sure enough, when I was working away from home with a Mighty Mouse that was a little older, my suspicions were confirmed. The wheel/ball felt loose and scrolled unreliably. I decided to start bringing my own, newer Mighty Mouse to remedy the problem. But that’s not the worst part: about two weeks later, my own mouse ball/wheel stopped responding to down scrolls. It still felt fine, but rolling the ball down had no effect.
Tip #1: Get A PC Mouse
In summary: I found right clicks to be unreliable, I wanted tactile feedback on the right clicks and the side pads, I like standard mouse contours, and the ball/wheel was cool but seemed pretty fragile. The end of the story? I bought a $30 standard PC mouse and loved it! Like most mice nowadays, the Mighty Mouse and my PC mouse both connect with USB, so all I had to do was swap it in and it worked fine. Actually, it happened to be the best mouse I’ve ever used, even better than the standard Dell mice that I am so used to.
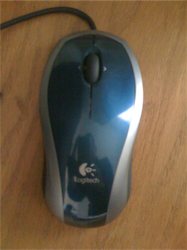
And so, for $30, the last several paragraphs become a waste of breath, and I become much happier with my Mac. The only downside is that my blue, silver and black Logitech mouse throws off the aesthetic of Apple’s all silver and white color scheme. On this issue, my sense of touch won an easy victory over my sense of sight.
The Keyboard
As a programmer, the mouse is important to me, but the keyboard is even more so. I use it all day every day to write code, emails, web articles, play games, and more. It has to work and work well, or I’m in bad shape. There are really two issues at hand: the keyboard itself and the keyboard shortcuts. Although these two aspects of the keyboard are related, I’ll try to take them on one at a time so it doesn’t get too confusing.
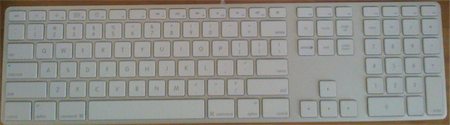
Two Keyboard Choices
There are two basic keyboard styles on desktop Macs. Both are very thin and aluminum with white keys. The most obvious difference is the size–one is about 6 inches shorter. To accommodate the reduced size, it moves the keys around, shrinks some keys, and loses the number pad. The short version is the basically the same as you’ll get on any Mac laptop.
Tip #2: Get The Full Keyboard
To anyone used to Windows, I would highly recommend the full keyboard, called the “Apple Keyboard with Numeric Keypad” (by the way, they’re the same price). I’ve used both, and given the choice, I prefer the larger one any day. Let’s start with the only advantage of the smaller keyboard: it’s a bit… smaller. But even the full keyboard is small by Windows standards. It’s very thin, slightly less wide, and about an inch shorter vertically than it’s Dell counterpart on my desk.
Now for the downsides of the standard, smaller keyboard, as I see them (in rough order of importance).
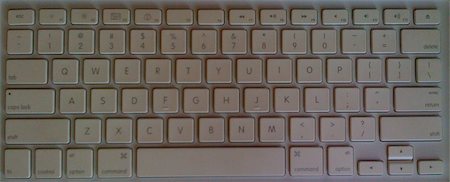
1. The arrow keys are 1/2 as tall, so that they take up the vertical space of a single key. This made it harder for me to feel which one I was pressing, and I’d sometimes press the wrong one.
2. The arrow keys are smashed into a very small area near other keys, instead of in their own area with a lot of space. This means that as you change back and forth from pressing letter keys and arrow keys, your hand doesn’t have to travel as far, but I found them to be harder to find and press independently of the surrounding keys.
3. The control key is smaller, and there is a function key to the left of it. As I mention in the keyboard shortcuts section, I use control more than just about any non-letter key, and so I like it a little bigger and in the corner of the keyboard. Why they chose to cram 4 modifier keys to the left of spacebar I’ll never know… but more on that later.
4. There is no forward delete key. Instead you have to press Command and delete at the same time to reproduce a forward delete. This isn’t that big a deal, but since I use forward delete a lot, I think that it deserves its own key.
5. It’s easy to hit the caps lock key by accident when going for ‘a’ or shift. Actually, this is a problem on the full keyboard too. Dell keyboards (and I think most other PC keyboards) solve this problem by making a dip on the right side of the caps lock key so that your pinky has to travel just a bit further to press the key, and it’s easy to feel when you’ve hit the gap. Interestingly, Apple obviously noticed this problem, because there is a way to disable the caps lock key entirely (we’re getting there in a sec), but decided not to fix it in hardware.
Okay, Enough Convincing
That incredibly long rant is why I think the larger keyboard serves programmers and former Windows users better than the small one. Now sure, I could just say “go plug in a PC keyboard” like I did for the mouse, but now that I’m used to the full keyboard, I like it about as much as any other keyboard. Unlike the mouse, it eventually won me over.
Unfortunately, the laptops all have the smaller keyboard configuration, complete with tiny arrow keys and 4 modifiers smashed to the left of space bar. As of right now, it’s one of the largest reservations I have about the MacBook. It may sound silly, but a keyboard that feels right is that important both to my productivity and how much I enjoy using the computer.
The Keyboard Shortcuts
And You Thought I Was Crazy About Keyboards
I know I just spent a while explaining how important I think the keyboard is, but the keyboard shortcuts are even moreso. Imagine if you had to hold down shift, caps lock, and tab to enter a letter key. It would feel terrible, and you’d be slowly hunting and pecking with your right hand alone. Now imagine that you could press every key with your off-hand, easily and quickly, as well as execute commands like Save. You’d never need your primary hand, and it would be free to use the mouse all the time (or eat, or hold a book up to the screen, or whatever).
These two extremes show why the keyboard shortcuts (sometimes just called keystrokes) make just as much of a difference as the keyboard itself in terms of comfort and usability. So where does the Mac’s keystroke configuration fall? In short, I like Windows’s a lot better, but there is a plus side: Mac’s is much more customizable. You can reproduce a Windows-like environment almost exactly, and even come up with your own shortcuts that don’t exist in Windows. I’ll show you how it’s done, as simply as possible.
So Many Modifiers
Mac keyboards have 5 modifier keys: shift, control, option, command, and function. On the full keyboard, control is in the same place as it is on Windows keyboards, but option comes next (where the Windows key normally is), then command. Function isn’t used as much on a full sized keyboard, but on the small ones it reproduces some of the missing keys. Why so many modifiers? Honestly I’m not sure. Windows has a bunch too, but the windows key is almost never used, and alt is usually only used for traversing menus. Control and shift make up just about every regular shortcut. Not so on the Mac.
Mac “command” vs. Windows “Ctrl”
If you do a lot of typing (and especially if you type code in an IDE), you may have learned to keep your pinky on ctrl (and shift) just about all of the time. Here’s a quick list of things that you can do with control in almost every Windows text editor:
ctrl+c for copy
ctrl+x for cut
ctrl+v for paste
ctrl+f for find
ctrl+z for undo
ctrl+y for redo
ctrl+s for save
Some are more specific to word processors:
ctrl+b for bold
ctrl+i for italics
ctrl+u for underline
ctrl+p for print
And some especially useful for programmers:
ctrl+RIGHT to advance the cursor one word (left works too)
ctrl+SHIFT+RIGHT to advance one word and continue the selection
ctrl+DOWN usually controls the scroll bar in some way (up works too)
…and so on. The point here is that just about every normal text editing function can be accomplished with control. On the Mac, Command replaces control for the entire first two sets, and option replaces control for the last set. Why is this a problem?
Commanding Discomfort
It’s a problem because now that I had to use command for almost everything that I used control for before, I ended up having to press one of the more awkward keys on the Mac a whole lot. For years and years I’ve gotten used to pressing modifiers with my pinky, and executing the other command in a shortcut with my index finger (at least when the index finger can easily reach it). This style would take me a long time to unlearn. But pressing command+z, command+x, command+c, command+v, and command+s in this way is very painful on the Mac, because I have to scrunch my fingers and contort my hand to do it.
Maybe other people type totally different than I do, but I find it much more comfortable to use control as the dominant modifier key the way it is in Windows, and keep my pinky on control or shift most of the time. The good news is, Mac lets you!
Tip #3: Swap Control and Command
To switch these two keys, click Apple->System Preferences->Keyboard & Mouse. On the Keyboard tab, click Modifier Keys… and notice that you can switch them around. I’m not sure why function didn’t make the list, but with a full keyboard I suppose it’s okay. Swapping control and command will make your keystrokes feel MUCH more like Windows, and in my case, about 10x more comfortable. These are global changes, so you can rest assured that every program will respect your decision.
“Natural” control is hardly used at all on the Mac for everyday functions. It combines with a left click to make a right click, but with a two button mouse, you probably don’t care. It also… um… oh, control+s saves a draft in gmail, which goes against the grain of other Mac programs. So for those two things, you’ll use command now. Sad? Probably not.
While you are on this screen, now is the perfect time to consider the next tip:
Tip #4: Disable Caps Lock If It Annoys You
I do like the full Mac keyboard, but I do still hit caps lock on occasion. I decided to turn it off entirely through this menu. That way when I do press it in the middle of a sentence, I don’t have to go back, erase, and retype a bunch of characters. But if you’re better than I am with the Mac keyboard and don’t ever hit it on accident, by all means leave it on.
Tip #5: Customize Program Keystrokes To Use The Control Key
Many text editing programs, especially ones designed for programming, allow you to customize the keystrokes to issue commands. When a program asks you to enter a keystroke, you’ll press control (the one you actually want to hit), which it will display as “command” (assuming you followed Tip #1). Personally, I like to take the option and command keys almost completely out of the equation, and map everything possible to control. This will make things much more Windows like, easier to remember, and (for me) more natural to execute with the pinky and index finger.
Although different programs give you a different level of customization, IDEs like my favorite Eclipse have a ton of options. The key bindings may show up in a different place in each one, but you can be reasonably confident that it will be under preferences somewhere. In Eclipse, it’s Eclipse->Preferences->General->Keys. Notice the totally customizable keystrokes and the hundreds of possible actions. This is where I set it to advance a word to be control+RIGHT, set run ant build to be control+b, move selection up a line to be control+UP, etc. Just keep an eye on the “conflicts” box and make sure that you unbind or reassign any keystrokes that conflict.
As a side note, it’s really nice that Eclipse tells you when there are conflicts, since most programs (including the Mac OS itself) just lets you screw things up without warning. Eclipse even allows you keep conflicts and opens up a gui that lets you pick the command you intended when keyboard shortcuts are ambiguous.
Tip #6: Advanced Keystroke Customization
During my quest to figure out how to improve the keystrokes, I ran across a great site about changing Mac key bindings where I Iearned that you can create a special file that lets you customize your keyboard shortcuts at the OS level. [Note: As June 2013 erasetotheleft.com appears to be down.] Why do it? While Eclipse or your other Text editing program might be fine with you changing the “advance cursor one word” keystroke from option+RIGHT to control+RIGHT, the rest of the Mac world won’t know about it. And for the many programs that don’t let you change the keyboard shortcuts in their preferences menu (TextEdit and FireFox being the big ones for me), this method lets you change the shortcuts for many of those stubborn programs at once.
To get started, you create this directory
~/Library/KeyBindings/
(where ~ is Unix shorthand for your home directory) and create this file in it:
DefaultKeyBinding.dict
You can edit the file using TextEdit, TextPad, Vi, or whatever you like. Now you enter pairs of keystrokes and actions to create your own keyboard shortcuts. The tutorial does a great job describing how write the file and reproduce some common actions. Here’s the file that I use:
/* Paul’s OS X key bindings file */
/* control+LEFT to move back a word, add shift to select */
“@\UF702” = “moveWordBackward:”;
“@$\UF702” = “moveWordBackwardAndModifySelection:”;
/* command+LEFT to move to the beginning of the line, add shift to select*/
“~\UF702” = “moveToBeginningOfLine:”;
“~$\UF702” = “moveToBeginningOfLineAndModifySelection:”;
/* control+RIGHT to move forward a word, add shift to select */
“@\UF703” = “moveWordForward:”;
“@$\UF703” = “moveWordForwardAndModifySelection:”;
/* command+RIGHT to move forward a line, add shift to select */
“~\UF703” = “moveToEndOfLine:”;
“~$\UF703” = “moveToEndOfLineAndModifySelection:”;
/* Control+UP to move current line up and select it */
“@\UF700” = (“selectLine:”,”cut:”,”moveUp:”,”moveToBeginningOfLine:”,”paste:”,”moveUp:”,”selectLine:”);
/* Control+DOWN to move current line down and select it */
“@\UF701” = (“selectLine:”,”cut:”,”moveDown:”,”moveToBeginningOfLine:”,”paste:”,”moveUp:”,”selectLine:”);
For letter keys, you can just enter the letter itself (like ‘a’). ‘@’ stands for command (well, it’s whatever the Mac thinks is command, which for me is the control key), ‘$’ is shift, ‘~’ is control (i.e., command in my case). The unicode characters represent arrow keys, since they aren’t displayable.
The last group is an example of how you can encode multiple actions into the same keystroke. Here, control+UP selects the current line and swaps it with the line above it, executing 7 commands to do so (this command reproduces a limited version of a built in Eclipse shortcut). These user-defined macros allow you to really customize your keystrokes and do some pretty cool things.
Not Every Program Is Respectful
Some programs don’t let you their modify their keystrokes, nor do they respect the ones in your DefaultKeyBinding.dict file (FIREFOX, cough). In fact, that’s the reason I switched from FireFox to Safari. Safari let me type in this article using my user-defined keystrokes, which was really nice. But every program WILL recognize if you swapped modifier keys (Tip #3), since that change is system-wide. The other small disclaimer is that complicated shortcuts (like the last two in my file) may behave slightly differently in different environments, even if it does respect the key bindings file. For example, those last two commands don’t work at all in FireFox (none of them do), they work somewhat well in Safari, but they work perfectly in TextEdit. In this case, it’s not a big deal, since they are really only useful for editing code, which is something I do a whole lot more in TextEdit than FireFox or Safari.
Miscellaneous
Tip #7: Remap Offhand Modifiers
If you don’t ever use the modifier keys on one side of the keyboard for editing text (I never touch the rightside ones), remap them to useful OS functions. For example, I changed the right-side command key to be the OS X equivalent of show desktop, and the right-side option key to be “All Windows” (shrink and spread out active windows so that they are all visible). Both of these can be changed in Apple->System Preferences->Exposé and Spaces->Exposé. I think these keys are easier to work with and remember than f9 and f10, which are the defaults.
Tip #8: Get The Proper Display Adapters
Unlike my desktop Dell, my Mac Mini can’t dual monitor out of the box. Well, it can if your box included a second display adapter, but you’d have to know to ask for it, and I think it’s the same deal for most Mac models (desktop or laptop). With the Mac Mini, you get the correct adapter to connect to 1 DVI monitor (called Apple Mini-DVI to DVI adapter). But there is actually another port on the back of the Mac mini with a different end, and you connect this second port to a second monitor (using a Mini DisplayPort to DVI adapter).
Second, don’t forget to buy a VGA adapter (either Apple Mini-DVI to VGA or DisplayPort to VGA) if you ever plan to connect to a VGA monitor. I found out the hard way that a regular DVI-VGA adapter (which comes with most Dell PCs and is easily available at electronics stores) WILL NOT combine with your Apple Mini-DVI to DVI adapter and let you hook up to a VGA monitor, because it uses a different kind of DVI. You have to get the correct, 1-piece adapter from Apple. And if happen to be in a city without an Apple Store when you need it, you may not be able to find it (I checked Best Buy, Staples, Office Max, and Radio Shack… nothing).
You can scope out each of these adapters here.
Tip #9: Activate Tab Navigation
When I first started using the Mac, I was surprised that I couldn’t navigate menus using the arrow keys and tab. Sometimes it’s a lot faster to use the keyboard, especially when your hand isn’t already on the mouse. However, Pogue’s book pointed me to a checkbox in Apple->System Preferences->Keyboard and Mouse->Keyboard Shortcuts at the bottom of the page where you can change Full Keyboard access to “All Controls.” This allows you to navigate the menus with tab (where tab switches the active button or menu item) and spacebar “clicks” the selected button.
It’s a little different from the Windows version though. First, hitting Enter doesn’t press the blue outlined button you selected with tab, it presses the solid blue highlighted button (a default for the menu). Second, on Windows you use tab to change to the next group of widgets (like buttons) and arrow keys to select the next or previous widget in the group. On Mac, the arrow keys don’t always work to switch from widget to widget, sometimes you’re stuck with tab alone (or shift-tab to go backwards).
—
I hope you found some of these tips useful, or at least an interesting insight into the world of Mac from the perspective of a PC user. Feel free to leave a comment if you liked the article, hated it, have your own tips to add, or are just bored!


