
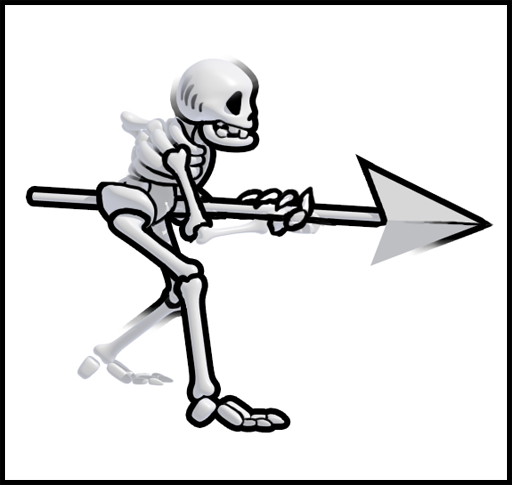
[Note: If you’ve played Pizza Vs. Skeletons you’ll notice that the look of the skeletons changed a bit since I wrote this article. I still used this technique for several of the enemies, however.]
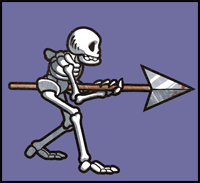
Despite having only released one screenshot of Pizza Vs. Skeletons so far, I’m hoping that one aspect of the game has been made clear: We are attempting to achieve a very unique visual style with the game. It is always difficult to summarize an aesthetic, but I’d say that Pizza’s look hovers somewhere between a dark, hand-inked, graphic novel, and the swirling dreamlike insanity of a Vincent Van Gogh painting.
As soon as I settled on this style, an important question was raised: How in the world would I animate it? First, let me admit something up front: I’m a decent animator, but I’m definitely no Miyazaki! Far, far, from it! I’ve always been partial to creating background art, and animation is a bit of a second language to me. Also, skeletons, even cartoon skeletons, are intricately detailed and unforgiving to animate. I didn’t feel confident that I could convincingly animate all the ribs, vertebrae, and phalanges using traditional animation techniques.
I had to construct a new animation process.
Rotoscoping
Rotoscoping is a 2D animation technique first used in 1915. The basic idea is that animators trace their drawings over live action footage shot with real actors, giving lifelike movement to the final animation. The results are fluid, convincing, and have been used to great effect in movies like Disney’s Snow White.
Having always been a fan of the process, I wanted to try applying rotoscoping to Pizza Vs. Skeletons. Obviously I can’t shoot real live action footage of moving skeletons, so I had to combine rotoscoping with a more modern technique: 3D animation.
From 2D to 3D to 2D
The first step was to create a 2D drawing of the front and side views of the skeleton.
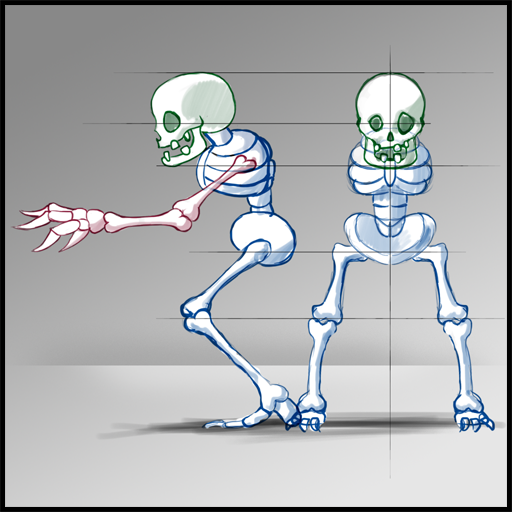
These drawings had to be quite precise, so that the front and side views would line up exactly.
Next, using the amazing (and free) 3D software Blender, I modeled the skeleton using the 2D drawings as a reference image.
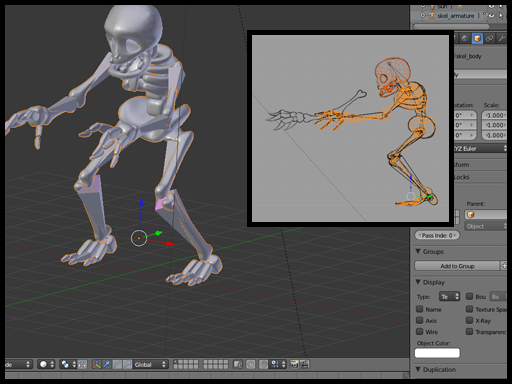
After modeling, I rendered animations for each of the skeleton’s actions.
Next came the most painstaking step: I manually traced over each frame of the 2D animation in Photoshop, using my Wacom Pen Tablet.
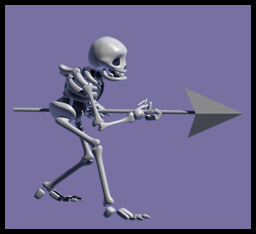
Finally, I added shading, color, and texture to achieve the final animation.
I’m pretty happy with the result! It preserves the feel of the 2D aesthetic that we’re driving for, while having the fluidity and precision that players expect from modern games. My new process is certainly by no means fast: I essentially have to do all the work that a 2D animator and a 3D animator would have to do. I think the unique, hand-crafted look, is well worth it!
Side Node: Why not Cel Shading?
It may occur to some of you that I could have used cel shading to produce a similar effect. Cel shading has come a long way in the last few years, and I’m particularly impressed by the look achieved in Marvel Vs. Capcom 3. Amazing! However, it is a not a technique I’m technically proficient with, and to be honest, I think it looks tacky in all but a few exceptional cases. I am a perfectionist when it comes to using various line weights, textures, and shading, and cel shading doesn’t offer enough control over these design elements. Plus, I simply enjoy drawing each animation, one frame at a time!


