
Welcome to the Official MadStone Strategy Guide! If you’re looking for advice on how to improve your MadStone skills, or if you’re just interested in how the game plays, you’ve come to the right place.
About the Guide
Hey everyone, this is Paul, from RiverMan Media. My brother Jacob and I created MadStone. Long before the game was finished, I spent hundreds of hours play testing it. I also played it a lot just for fun, which sometimes slowed down the game’s progress! In this guide, you’ll be getting inside information on how to play the game from the people that created it from start to finish. Enjoy!
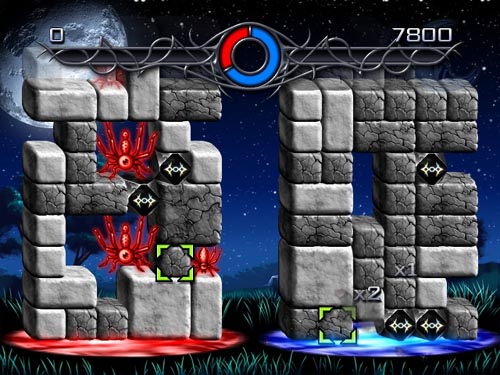
Table of Contents
The Basics: This section covers everything new players should know to tackle the beginner and easy modes. I recommend that beginners also check out the interactive in-game tutorials. You can access them from the main menu (select “Training”).
Cascade Details: You’ll learn the precise rules that govern cascades, and how to use them to your advantage. Understanding cascades is vital for getting large combos. This information will also be really useful in the puzzle levels (the bonus rounds in Arcade mode).
The Combo System: Working the combo system is a huge key to winning MadStone. This section teaches the strategy behind maintaining a combo and provides advice on how to begin and end combos. There is a walkthrough of a large combo example, using screen shots to explain it step by step. You’ll also get some hard numbers: how much Quake time you earn for large combos, how much time you lose per strike, and more.
All About the Quake: When is the best time to Quake? How much time should you earn before using a Quake? How do you maximize your chances of breaking an opponent’s MadStones? All of these questions are covered in this section.
Update Log
October 5th, 2008: Version 1.1 Complete. Minor edits, plus some additional info on ending combos in “All About the Quake”.
October 3rd, 2008: Version 1.0 Complete. More to come!
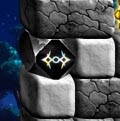
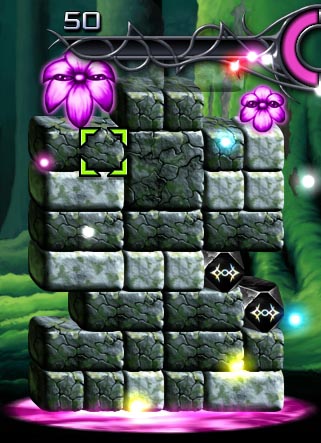
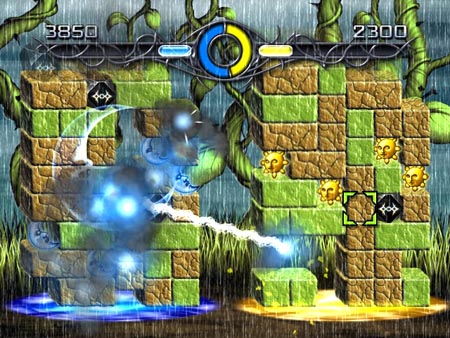
To play MadStone, hold the Wii Remote sideways. When the match starts, you’ll see a bunch of blocks fall onto the screen after a second or two. In level one, you’ll be looking at something like this:
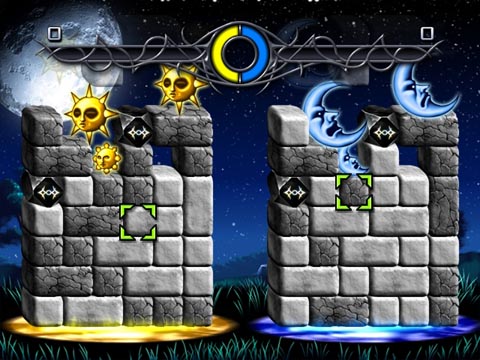
In this picture, the screen is mostly filled with blocks. Near the top of the screen, you’ll see that both players have some MadStones. For player 1 (on the left), the MadStones are suns, and for player 2, the MadStones are moons.
Objective: Get Your MadStones Into the Pool
The object of the game is to get your MadStones into the mana pool at the bottom of the screen. You do this by breaking the blocks that are in their way, so that they can fall into the pool. Big MadStones are worth more than the little ones, so try to get these down quickly.
The Blocks
The screen is mostly filled with grey blocks. Some are larger than others, but all blocks work the same: they are either solid, or they are cracked. In this picture, the solid blocks are light grey, and the cracked blocks are the darker ones. If you damage a solid block once, it cracks. Damage a cracked block, and it breaks, potentially allowing your MadStones to fall closer to the pool.
Press 2 Button to Damage a Block
There are a couple ways to damage blocks. The simplest way is to move your cursor over a block with the +Control Pad, then press the 2 Button. This is called a “strike.” Whatever block is under your cursor will take damage, either becoming cracked or breaking. You can move your cursor quickly by holding a direction on the +Control Pad. You can also accidentally break your own MadStones by striking them. Avoid this as much as possible, since you need MadStones to win!
Note: If a block is falling, you can’t strike it. You must wait until it has stopped moving. Your cursor turns into a red X if you won’t be able to damage the block under the cursor. Your cursor is also an X if you are hovering over a MadStone.
Falling Objects Damage Blocks
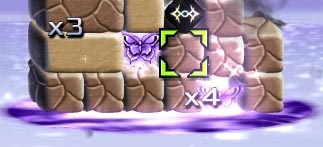
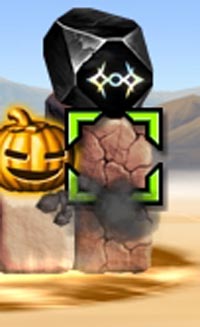
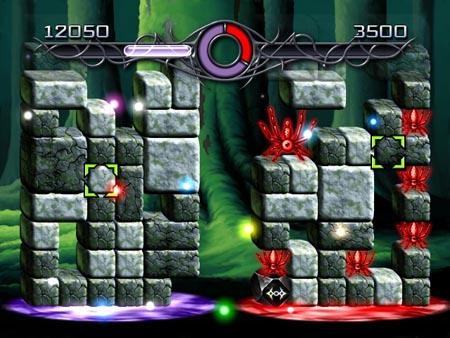
You want to get some MadStones at the top of the screen down to the bottom, but breaking all of those blocks using only strikes would take forever. Luckily, there’s a better way. Anything that falls on a block (including MadStones, other blocks, or bombs) will damage the block. This is a picture of a puzzle level, which will help show what I mean:

All of the blocks here are cracked. If you struck the block under the cursor, the top MadStone would fall and hit the second block. That block would break, allowing the rightmost MadStone to fall into the pool, and the center MadStone to fall once more. The center MadStone would collide with the third block, which would break, allowing the leftmost MadStone to fall into the pool. Finally, the center MadStone would fall again, breaking the last block and allowing the MadStone to sink into the pool.
With just one strike, you’ve collected 3 MadStones! And while all of this was going on, you could also have been moving to other parts of the screen, setting off other chain reactions (we call these “cascades”). In this picture, there is nothing else to break, but in a normal match, the blocks keep on coming.
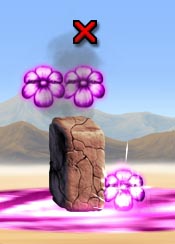
Bombs Destroy a Row of Blocks
Bombs look like black blocks with arrows pointing left and right. All you have to do to use a bomb is strike it while it is not moving. Any blocks in the same row as the bomb will be destroyed, possibly starting some cascades. Keep in mind that falling blocks won’t be affected by the bomb, and MadStones are never affected by bombs. One last important thing to remember is that bombs don’t take damage from falling objects. The only way to destroy a bomb is with a strike, so don’t let too many of them collect at the bottom of the screen, or they could block some of your MadStones from falling into the pool.
Fill The Donut Meter To Win
The donut meter at the top of the screen tells you who is winning by which color is filling it the most. When the game starts, the two colors are even. As you collect MadStones, the meter fills a little bit more with your color. Once the meter is entirely full of your color, you win the match. In most levels (and sometimes multiplayer games), a player must win multiple matches by filling the donut meter several times to win the whole contest. If the game keeps going after you’ve filled the donut meter once, keep playing!

Note: You might not win right away if your opponent is in a combo. Combos are up next.
Score Match and MadStone Match
In addition to the standard matches, there are also matches for score or for MadStones. In these matches, the donut meter starts empty, and fills as players collect more points (in a score match) or more MadStones (in a MadStone match). You win once the donut meter is filled to the half-way point with your color. You can choose to play these kinds of matches by selecting them in 2-Player mode. They are also sprinkled throughout Arcade Mode. The screen just before each arcade level will tell you what kind of match you will be playing next, as well as the goal (e.g., Level Goal: 35 MadStones).
Combos
Collect a MadStone to Start a Combo
To begin a combo, just collect a MadStone. You’ll see a number rise up from the pool. This is the size of your current combo. While your combo is still active, all the MadStones on your play field will glow.
Keep Objects Falling to Continue a Combo
As long as anything in your play field is falling, your combo will continue, and your MadStones will keep glowing. Once everything on your grid is stationary (even if it’s for just an instant), your combo will end. The more MadStones you collect while the combo is active, the larger your combo will be.
Gain Quake Time From Combos
As your combo gets large (at least 3x), you’ll notice a clear bar appear at the top of the screen near the donut meter. This bar represents how much Quake time you’ll get when the combo is over (but you don’t have the Quake time yet).
![]()
Fewer Strikes For More Time
Each time you strike, this clear bar shrinks just a little bit. This means that once you’re in a combo, you want to minimize the number of strikes you make in order to get more Quake time once the combo is over. The key is to make good use of cascades and bombs in order to get the most MadStones for the fewest strikes.
Colored Bar = Quake Time!
Once the combo is over, if you had any clear bar, this will turn to a colored bar, indicating that you have some Quake time. Your clear bar also turns colored very slowly during a combo, giving you a little bit of Quake time to work with during a long combo.

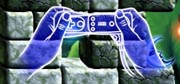
Shake The Wii Remote to Quake
To use that hard-earned Quake time, just shake the Wii Remote! Small, quick shakes work better than large, extreme motions. You’ll see a large, glowing version of your MadStone rise from the pool, and blocks will rapidly be destroyed. The higher your MadStone rises on the screen, the faster blocks will be destroyed.
Quakes Destroy Your Blocks, Opponent’s MadStones
If you are shaking quick enough, your glowing MadStone will be high above the pool. Strong Quakes like this have a chance of destroying an opponent’s MadStones.
Cascades
This section is dedicated to teaching you everything there is to know about cascades (the chain reactions that occur as blocks fall on each other). To become a MadStone expert, you should be able to quickly predict the result that breaking any particular block will have on the structure of the play field. You should also be able to extend an existing cascade as long as possible.
These skills will help you break the largest number of blocks with the fewest number of strikes. The puzzle levels (the bonus rounds in Arcade Mode) are also built around this concept, so this page will give you a lot of helpful pointers for clearing them. After you understand the rules, it will just take a little bit of practice before you can see right through those puzzles and complex cascades.
Block Breaking 101
Standard Cascades
The simplest way to cause a nice cascade is to crack all of the blocks under a MadStone, then break the block directly under the MadStone. The MadStone will break each cracked block as it falls, eventually reaching the pool. There was an example of this kind of cascade in the tutorial:
You Can’t Damage a Falling Block
Falling blocks can’t be damaged by strikes, bombs, or other falling objects. The only way to damage a falling block is with a Quake.
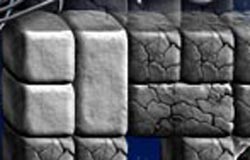
Wide Blocks Are Wide Targets
The two wide blocks (2×1 and 2×2 blocks) can be broken just a bit easier than the narrow blocks (the 1×1 and 1×2 blocks). This is because they are two squares wide, and thus can be hit in two places by falling blocks. In this picture, if you broke the cracked block in the middle, the 2×1 block would fall on the 2×2 block. Because the 2×2 block would be hit twice (once on the top left and once on the top right), the 2×2 block would break from the impact.
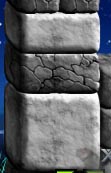
It’s a little hard to see in this picture, but above the top 2×1 block are two cracked 1×1 blocks. Now let’s say you broke the upper 2×1 block (the solid one). The two 1×1 blocks would fall, breaking the cracked 2×1 block, then they would both fall again, breaking the 2×2 block too. This is because each 1×1 block hits the 2×2 block once, causing damage twice (enough to break any block).
Wide Blocks Save Strikes
If you remember from the section on combos, you want to minimize the number of strikes you use during a combo. Although the wide blocks take damage just the same way as any other block, destroying them is often a better use of your strikes than the 1×1 or 1×2 blocks. This is because they’re usually supporting two blocks (or another wide block). When these blocks fall, they will cause a total of 2 damage to whatever they land on, instead of just 1.
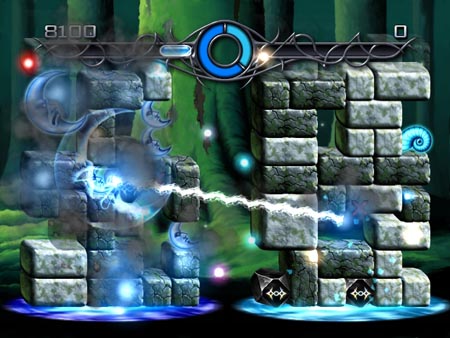
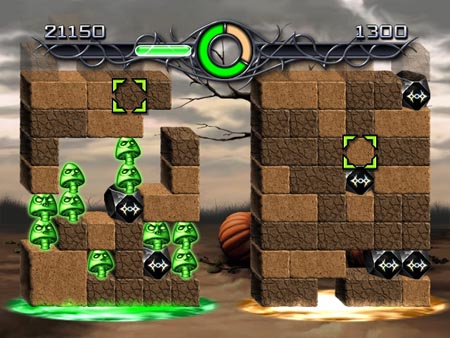
Start Cascades High Up
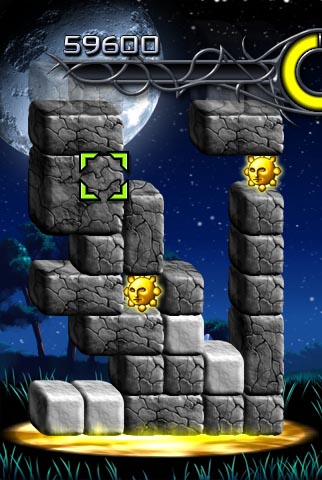
The longer a chain reaction continues, the more strikes you’ll save. For example, if you try to start a cascade near the bottom of the screen, the most it might destroy is two or three blocks. But if you start cascades near the top of the screen, the damage potential is much greater.
If player 1 strikes where the cursor is, the big MadStone will fall all the way to the bottom. For just that one strike, you destroy 9 blocks and crack one more (the solid 1×1 block on the bottom row). Not bad for just 1 strike. A single strike made any lower would not earn the MadStone.
Check “The Combo System” section (up next) for more cascade examples.
Use the Impact Delay
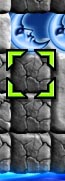
You may have noticed that cracked blocks don’t break instantly when something falls on them. Instead, there is a short delay (it’s about 1/4 second long) before the block breaks. In this picture, you can see that the block in the bottom right corner has been hit by the block above it, and is just starting to fade from the impact.
See how the cursor is green? That means that in the 0.25 seconds before the bottom right block breaks, you have time that you can operate on the blocks above it just like normal. A quarter second my not seem like a lot, but it’s just enough time to strike a block twice if you move and press the 2 Button quickly. You can also strike a “falling” bomb during the impact delay, breaking any stationary blocks in the same row.
Puzzle Mode Hints
Several of the puzzles require you to use the special properties of wide blocks mentioned earlier. It might be that you destroy the block from two simultaneous impacts, or that destroying a wide block allows more items to fall.
During a long cascade, there are several chances to act during the impact delay. You may have to break a block or set off a bomb during one of these short timing windows.
Although you never want to strike your own MadStones during a normal game, keep in mind that you can!.
When a block is falling, it is safe from impacts, bombs, and strikes. Normally, this hampers your ability to destroy it. But what if you wanted the block to survive an impact or bomb blast? Then it would be an advantage…
Combo Benefits
Combos can give you Quake time, which is really important, but they also help you win in other ways. In a Standard match, the larger your combo, the more your donut meter fills up when you get a MadStone. Also, you can’t lose a standard match while you are in a combo. This lets you start a combo right before you are about to lose, and even if your opponent fills the donut, you may be able to come back to win the game if you get a large combo going. Finally, combos are the only way to get the large scores needed to win the score battles. Here’s a quick summary:
-Combos give you Quake Time when they end.
-Larger combos fill your clear bar with Quake time faster (during the combo).
-Larger combos fill your donut meter faster in a standard and score match
-You can’t lose a standard match during a combo.
Cascades Keep Combos Going
If it wasn’t for cascades, combos would be almost impossible. You’d have to move as fast as the computer on Savant Mode if you wanted to get any Quake time.
Move From Column to Column
The key to long combos is to get multiple cascades going at once. While one column of blocks is falling, move to another column, and start another cascade. Keep alternating columns as long as possible, starting cascades. If you’re fast, and good at predicting how cascades will turn out, you can get some very long combos without even Quaking.
Planning and Executing a Combo
Here’s an example of how to plan a combo and then see it through, step by step. Please enjoy these screenshots, it was really tough to take them while playing!
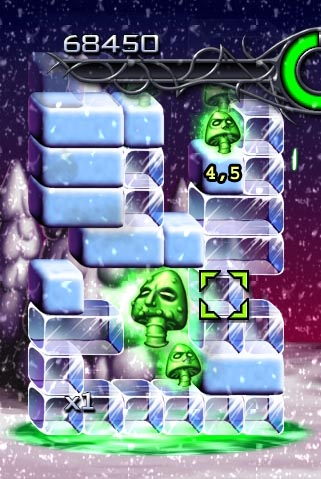
As the playfield looks right now, the cursor is on a solid block just below a MadStone that’s near the pool. In planning out our next moves, we have to predict how the cascades will alter the play field as the combo is executing. With a little bit of practice, you’ll be able to quickly recognize that you can earn all of these MadStones with 5 strikes. To choose the order of the strikes, I just picked the closest one each time. The order of the strikes is represented by the yellow numbers:

Notice how with each block we break, we change columns so that we can start working on an area that isn’t falling. This reduces our down time, letting us work more efficiently. After a couple seconds, the field has progressed to this point:
It’s kind of hard to tell in the picture, but the small MadStone in the middle just landed on the cracked ice block, which is about to break. We can tell from the glowing MadStones that the combo is still active. Right now, we’re heading up to make strikes 4 and 5. Currently, there aren’t really any other MadStones on screen, so it’s tough to decide what move to make next. Let’s just wait a second and see what happens as we head up to make strikes 4 and 5:
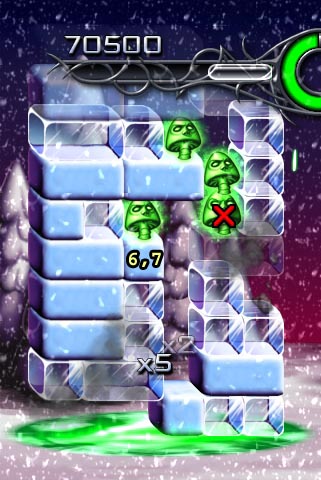
We just collected the two MadStones in the bottom center, and the ones on the right (below the cursor) are on their way down. By this time we can see that there are two more MadStones in the center. Once the falling 2×1 just above the pool hits the ground (in about 1/4 second), The MadStone in the third column will be stationary and we can strike at 6 and 7 to continue this combo. Jumping to there:
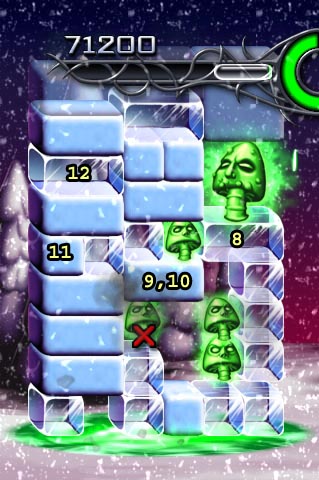
We’ll have an 8x combo once the MadStone below the cursor hits the ground. But let’s say we wanted to keep going. Next I’d strike at 8 for the big MadStone. Because the big MadStone is pretty high up, we’ll have quite a bit of time before it hits the pool. In this time, we can wait for the wide block (the block labeled 9,10) to settle on the solid 1×1 on the bottom row (cracking it).
By making strikes 9 and 10, the MadStone in column 4 will be ready to fall. By then, colums 3-6 will all be falling, leaving us with only columns 1 and 2 to work with. Then I’d strike at 11 and 12, which will allow the 2×1 above strike 12 to fall all the way to the ground, destroying 7 blocks and giving us lots of precious time to plan our next move.
Phew! It probably got a little bit tough to follow on the last screenshot there. I just wanted to illustrate the thought process behind alternating columns and timing cascades. Now let’s see.. since the beginning screenshot, we’ve made 12 strikes. For that, we’ve got a 12x combo that’s still running and broken a bunch of blocks, bringing more MadStones into play. Breaking all these blocks manually, without any cascades, would have taken around 40 strikes, costing a ton of Quake time. It also would have taken a lot longer, so much longer that maintaining the combo that whole time would have been nearly impossible. The moral of the story: cascades are your combo’s best friend.
Tricky Cascades
The best cascade isn’t always the simplest one. So far we’ve dealt mostly with cascades that start by breaking a block right below a MadStone or a wide block. Sometimes, there are situations where the best cascade is more complicated than that:
It may not look like it at first glance, but striking at the cursor in this screenshot will earn the center MadStone, break 6 blocks, crack 2 more blocks, and (if we were in a combo at the time) give us several seconds to plan our next move. Not bad for 1 strike! It may be tempting just to strike below the center MadStone to earn it, but that would be quite a bit less productive.
Actually, you could even break one higher than the cursor and do just a little bit better, but those two blocks up there are tough to see.
Combo Tips
Score, Quake Time Equations
As promised, here are some numbers on combos, scoring, and Quake Time.
-A 3x combo gives you 2 seconds of possible Quake Time (in the clear bar).
-Each MadStone after 3x adds 1 more second to the clear bar.
-Each strike takes away 1/5th second from the clear bar.
-Striking doesn’t affect the Quake Time you have already earned (the colored bar).
-Finishing a combo gives you (150 * n^2) points (n = combo size).
5 or Less Strikes Per MadStone
Since a strike removes 0.2 seconds for your clear bar and a MadStone adds 1.0 second, you’re only gaining Quake Time if it takes you less than 5 strikes to collect each MadStone. Using cascades wisely will reduce the number of strikes you need to use, as will Quakes. In general, you only want to use more than 5 strikes per MadStone if you really need to keep a combo going and there isn’t any other way.
Exponential Score Growth
The points you earn from a combo is calculated by squaring your combo size and multiplying it by 150. This means that a single 20x combo is worth twice as much as two 10x combos. Fewer big combos, not many small ones, will get you the most points.
All About the Quake
Now that you know how to maximize your Quake Time, what do you do with it? This section should give you some ideas.
Quake with 3 Seconds or More
3 seconds is just a rule of thumb, but I’ve found that any less than that is too short to do much damage. You’ll get exactly 3 seconds from a 4x combo (assuming you didn’t lose any clear bar from strikes). It looks like this in the bar:

Shake Fast, Not Hard
The game measures how quickly you are shaking (as in, back/forward/up/down motions) to determine how powerful your Quake is. It doesn’t measure how much you are actually moving the controller (except for the visual effect). The glowing MadStone that rises from the pool is a rough indication of how quickly you are shaking (higher is better). If it’s not moving, then you are shaking at the maximum measured speed. This happens when it gets about half way up the screen.
Quick Shakes, More Breaks
The higher up your glowing MadStone rises during a Quake, the faster your blocks will break. Also, there is a much larger chance of breaking opponent’s MadStones when you are shaking at the maximum speed.
Quake Damage Revealed
While you are using a Quake, this is how the game determines how to deal out the damage. There is a random chance that the Quake will do damage in any given instant while you are Quaking. This chance increases based on how fast you shake the controller. Once the game has determined that damage should be done, it picks a square at random on your play field or your opponent’s. If there is a block in that square (or a MadStone, in the case of your opponent’s play field), the Quake damages it. Keep in mind that Quakes don’t trigger bombs.
Good Quakes
The most productive Quake happen when:
-There are a lot of blocks on your play field.
-You have more than 3 seconds of Quake time.
-There aren’t too many bombs on your play field
-There are a lot of MadStones on your opponent’s play field.
Here is an example of a great Quake opportunity for Player 1:
Player 1’s grid is filled with blocks, so the Quake will be doing damage constantly. Player 2 has 1 big MadStone and 5 small ones, totaling 9 different chances that one of his/her MadStones will be hit. Player 1 also has enough Quake time to cause some serious damage.
Bad Quakes
On the other hand, here is an example of a bad time to Quake. Player 1’s grid is mostly filled with MadStones and bombs, which won’t be affected by the Quake. The bombs will also stop 3 of the MadStones from falling into the pool. Player 2 has no MadStones to break, so that feature of Quakes will go unused. For my opponent, I tend to wait until they have at least 4-5 MadStones on the grid before Quaking (Note: 1 big MadStone has the same chance of being hit as 4 little ones).
In this case, it would be a better idea to quickly set off the bombs and collect all of those MadStones with normal strikes.
Play While Quaking!
The computer plays while it Quakes (on the harder difficulties) and so can you. It’s not easy–it has taken me a long time to learn how to play while Quaking, and I’m still not great at it. But with practice, you can learn how to coordinate shaking the controller and making good moves.
Ending Combos Can Be Good
It may not seem like a good idea at first, but sometimes it makes sense to end a combo, even if you could keep it going. Here are a couple situations when it is smart to end your combo:
1. Your opponent has a bunch of MadStones on screen, and you have some clear bar but no colored bar. In this case, you can end your combo now, which will turn the clear bar into colored bar (giving you Quake time). Now use that Quake time since there is a large chance that you will be able to destroy a few of your opponent’s MadStones (which is always good).
2. You don’t have any MadStones on screen, and you aren’t in danger of losing any time soon. If you don’t have any MadStones on screen right now, chances are high that it’s going to take a ton of strikes to collect even just 1 more MadStone. And as we’ve seen earlier, more strikes mean less Quake time. This means that you may need several more MadStones before you will actually gain any more clear bar, and you will be losing clear bar in the process. Ending the combo now will allow you to break a bunch of blocks, get a few MadStones on screen, and then start a “fresh” combo, one in which you aren’t already penalized for making a lot of strikes.
I’ll add more as I think of them.
End Combos by Stopping the Cascade
You already know that your combo will end “naturally” if you just wait until everything on your play field has stopped moving. But let’s say you are in situation 1 up above. It’s critical that you end your combo as quickly as possible so that you can gain your Quake time and break some of your opponent’s MadStones. If you wait too long, they will collect the MadStones, and you will have missed your chance to break them.
To end a combo quickly, you just need to stop everything on the play field from moving. The easiest way to do that is to figure out where the cascade is going to continue, and strike the blocks that would prolong the cascade.
Remember this situation?
Well let’s say you wanted to end the combo right now. You could just wait until the MadStone under the cursor fell and broke the first ice block, then fell and broke the second ice block, then sank into the pool. But this would take at least a second or two. Instead, you could just manually break the two cracked ice blocks below the cursor, which would cost you two strikes but get you your Quake time quicker.
Thanks For Reading!
That concludes the Official MadStone Strategy Guide. Any time I update the guide, it will show up on the update log (which is on the front page of the guide). Thank you for taking the time to check it out, and enjoy the game!
Nintendo trademarks used under license. WiiWare is available only through the Wii console.


